Awesome Vim: Modern Guide To A Fully Featured Vim IDE
In this article I’m going to present you with a step by step guide for how to setup the Vim programming editor for the best possible development experience when developing embedded systems.
In particular we are going to setup:
-
Static analysis: so you can lint almost any language and see errors as you type.
-
Completion: we will set this up using language server so you have completion that works for many languages just the same.
-
AI integration: so you can have full access to OpenAI API inside Vim.
-
Git integration: so you can see who made recent changes to each line of code as you type and do git operations directly from the editor.
-
UI Enhancements: to make the Vim UI look very very nice.
-
Debugger integration: so you can do debugging from within Vim.
-
Task management: so you can manage tasks from within Vim.
-
Editing tools: such as advanced sorting and doxygen helpers to make code editing faster.
-
Command Cheat sheet: we’ll cover this at the end!
By the end of this article you will have a comprehensive and fully functional text editing workstation setup using Vim so that you can edit the most common text files that you encounter in embedded firmware development and C programming.
Here is what just some of the things we will cover will look like:
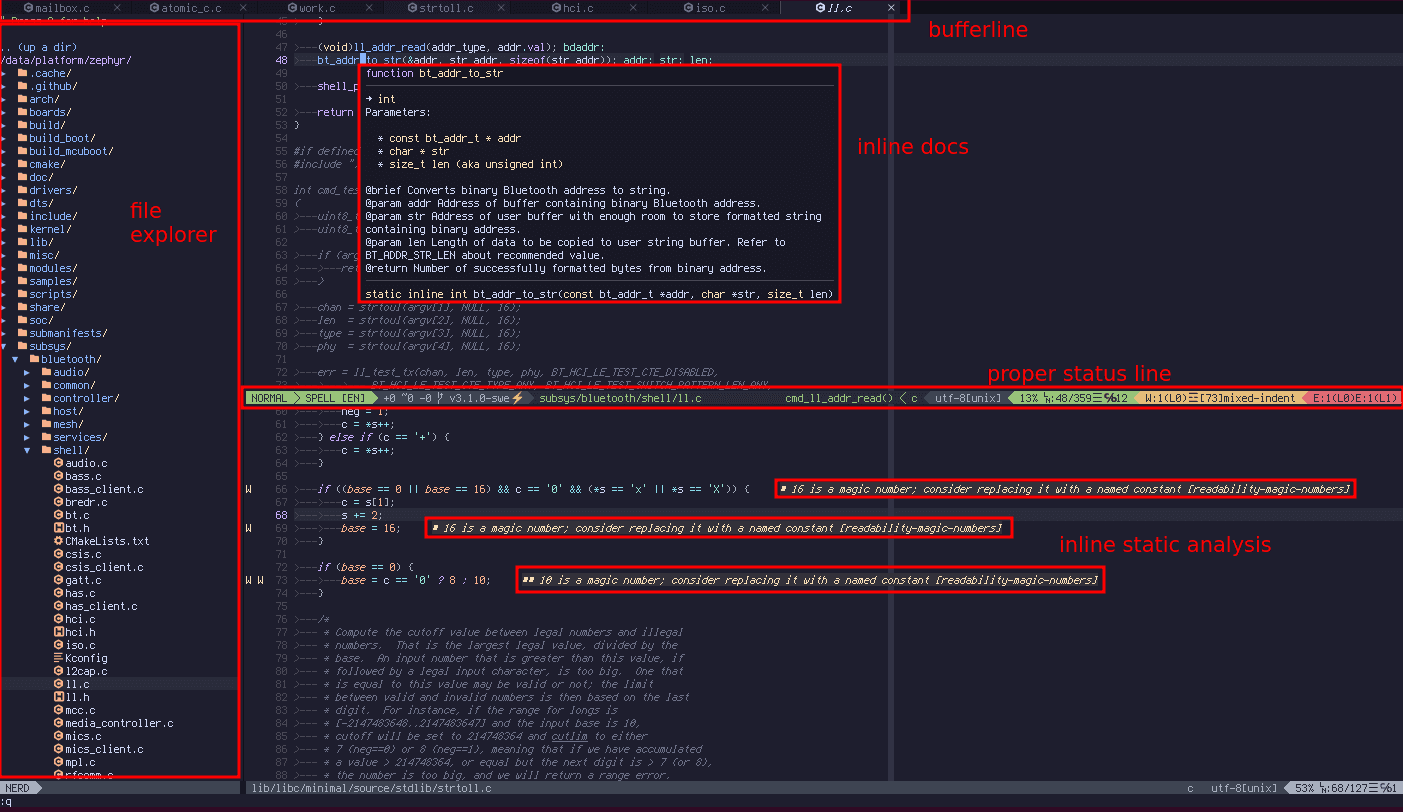
But we are not going to stop there. We will also add git interface, debugger interface and AI interface which are not seen on the screenshot above but described further down in the article.
Don’t want to read through the whole article to find out what the final Vim config will look like? Then grab it here
A Solid NeoVim Setup
As programmers we are essentially writers. Everything that we produce and get paid for is text. A text editor is our primary tool for making everything that we are getting paid for. Because of this, having a proper setup for the most important tool in your arsenal is extremely important.
Ideally you want to have a text editor that simply does not get in the way. However, there a few additional important requirements that we also need to have in place if we are going to create the best setup possible.
-
Language support: we need good language support not just for C/C++ but also for all other types of scripts that we write, including python, bash, yaml and reStructuredText.
-
Multi-target-compilation: Luckily we can handle cross compilation quite effectively using CMake so our editor does not need to support this, but it does need to provide efficient ways of building multiple targets.
-
Debugger integration: We need debugging support that can integrate with the editor but also is flexible enough to work with a wide variety of targets. For this we need to utilize GDB as much as possible and our editor must integrate with standard GDB really well.
-
Code analysis and optimization: While we are typing code, we want to have a comprehensive set of automatic checks run on our code in the background and any errors that are found must be shown as we type. This must be the same checks that we can also run in the CI server so any editor integration must use standard command line tools for this.
-
Version control integration: We want to at least see what lines we have added or changed but it would be good if we can also directly make commits to git from our editor.
Out of the box, Vim does not provide you with all of these features. Therefore I have created a set of scripts to setup vim with all necessary plugins to make it into a fully functional development environment for all forms of text that we use when building embedded firmware.
The whole setup, including building latest Neovim can be executed by
running the ./scripts/bootstrap/nvim script in the Swedish Embedded Workstation Repository.
Getting Started
First of all we are going to install latest stable version of NeoVim. We
need this in order to avoid errors in plugins which require relatively
new version. Your Ubuntu version is likely to be outdated, so let’s
build a new version of nvim. For this tutorial I’m going to use v0.9.0
of neovim, but you should go to the git repository and use the latest
stable version you can find.
# Create a temporary directory and build neovim
BUILD_DIR=`mktemp -d -p "/tmp/"`
NVIM_VERSION="v0.9.0"
(cd $BUILD_DIR && git clone https://github.com/neovim/neovim.git)
(cd $BUILD_DIR/neovim && git checkout $NVIM_VERSION)
make -j $(nproc) -C $BUILD_DIR/neovim
sudo make -C $BUILD_DIR/neovim install
Now you should see the version you have chosen when you run nvim --version. If
you still see a different version, then make sure you uninstall ubuntu default
NeoVim package sudo apt-get remove neovim.
If you don’t want to do any of these steps manually then you can just run the
nvim script in the swedishembedded repository:
git clone git@github.com:swedishembedded/workstation.git
cd workstation && ./scripts/bootstrap/nvim
Once you have the latest neovim, the plugins we will install next should work without any unnecessary issues. If you need embedded firmware consulting send an email to info@swedishembedded.com
Core configuration
First of all we are going to start by setting up our core default configuration. This is what you see in the beginning of the vim configuration file .
This is a good starting point to have before we install any additional
plugins. In fact, for many years I have been quite happy with using vim
in its default configuration with NERDTree as my main plugin that just
allowed me to view the file tree.
It is a powerful setup by itself, but as we start adding CI checks to our projects we want more to be done by our editor so that we can shorten the turnaround time between making an error and seeing it in compilation output. This is why we are going to install static analysis tools a bit later in this article. These tools are very useful for shortening this turnaround time.
Here is the options we will start with:
" c: Automatically break comments using the textwidth value.
" r: Automatically insert the comment leader when hitting <Enter> in insert mode.
" o: Automatically insert the comment leader when hitting 'o' or 'O' in normal mode.
" n: Recognize numbered lists. When hitting <Enter> in insert mode.
" m: Automatically break the current line before inserting a new comment line.
set formatoptions+=cronm
" This sets the width of a tab character to 4 spaces.
set tabstop=4
" This sets the number of spaces used when the <Tab> key is pressed in insert
" mode to 4.
set softtabstop=4
" This sets the number of spaces used for each indentation level when using
" the '>' and '<' commands, as well as the autoindent feature.
set shiftwidth=4
" This setting enables automatic indentation, which will copy the indentation
" of the current line when starting a new line.
set autoindent
" This disables the automatic conversion of tabs to spaces when you press the
" <Tab> key.
set noexpandtab
We also want to enable mouse. This is not the default when we are running in a terminal.
" This enables the use of the mouse in all modes (normal, visual, insert,
" command-line, etc.).
set mouse=a
Additional enhancements:
" This displays line numbers in the left margin.
set number
" This disables the creation of backup files.
set nobackup
" This disables the creation of swap files.
set noswapfile
" Automatically reload files when they change
set autoread
" Enable spell checking
set spell
set spelllang=en
" Highlight the current line
set cursorline
" Show white space characters and tab characters
set list
" Highlight the 100th column
set colorcolumn=100
" Set text width to 100
set textwidth=100
Now we want to enable visual mode shifting using the arrow keys:
" This maps the '<' and '>' keys in visual mode to shift the selected text one
" shift width to the left or right and reselect the shifted text.
vnoremap < <gv
vnoremap > >gv
Window and pane navigation and resizing shortcuts:
" The next four lines define key mappings for switching between windows using
" Ctrl + hjkl keys
nmap <silent> <c-k> :wincmd k<CR>
nmap <silent> <c-j> :wincmd j<CR>
nmap <silent> <c-h> :wincmd h<CR>
nmap <silent> <c-l> :wincmd l<CR>

" The next four lines define key mappings for resizing windows using Alt +
" hjkl keys:
map <a-l> :vertical res -5<CR>
map <a-h> :vertical res +5<CR>
map <a-j> :res -5<CR>
map <a-k> :res +5<CR>

" These lines define key mappings for moving the cursor 10 spaces at a time
" using Shift + arrow keys:
nmap <S-l> 10l<CR>
nmap <S-h> 10h<CR>
nmap <S-j> 10j<CR>
nmap <S-k> 10k<CR>
Folding settings:
" Enable folding
set foldenable
" Configure fold method
set foldmethod=marker
" Set the fold level to start with all folds open
set foldlevelstart=99
" Set the fold nesting level (default is 20)
set foldnestmax=10
" Automatically close folds when the cursor leaves them
set foldclose=all
" Open folds upon all motion events
set foldopen=all
Installing Plugins
Next we are going to install essential plugins. We are going to use vim-plug
for this and we are going to make sure that our vim config automatically
installs vimplug for us.
To install vim plug, we can run this code:
if empty(glob('~/.local/share/nvim/site/autoload/plug.vim'))
    silent !curl -fLo ~/.config/nvim/autoload/plug.vim --create-dirs
        \ https://raw.githubusercontent.com/junegunn/vim-plug/master/plug.vim
endif
Now we can install all the plugins that we are going to configure in
this tutorial. We must place all our plugins in the same section between
call to plug#begin and plug#end. You can not have more than one such
section in your vimrc. So we are going to do just that.
call plug#begin()
    Plug 'akinsho/bufferline.nvim', { 'tag': 'v3.7.0' } " plugin for tab line at the top
    Plug 'catppuccin/nvim', { 'as': 'catppuccin' } " a beautiful color scheme
    Plug 'dense-analysis/ale' " linting and fixing code.
    Plug 'habamax/vim-asciidoctor' " editing AsciiDoc files.
    Plug 'inkarkat/vim-AdvancedSorters' " advanced sorting of text.
    Plug 'inkarkat/vim-ingo-library' " a library of useful functions for Vim.
    Plug 'jeetsukumaran/vim-buffergator' " easy switching between buffers.
    Plug 'junegunn/goyo.vim' " Clean interface when you need it
    Plug 'kkvh/vim-docker-tools' " Docker integration
    Plug 'ledger/vim-ledger' " ledger accounting system.
    Plug 'lervag/vimtex' " LaTeX editing.
    Plug 'lewis6991/gitsigns.nvim' " text buffer Git integration.
    Plug 'madox2/vim-ai' " AI-assisted coding.
    Plug 'majutsushi/tagbar' " displaying tags in a sidebar.
    Plug 'mbbill/undotree' " Undo/Redo History Visualizer
    Plug 'morhetz/gruvbox' " Gruvbox: Color Scheme
    Plug 'neoclide/coc.nvim', {'branch': 'release'} " text completion endine
    Plug 'neovim/nvim-lspconfig' " Language Server Protocol Config
    Plug 'nvim-orgmode/orgmode' " Note-taking, Task-tracking, Outlining, Scheduling
    Plug 'nvim-treesitter/nvim-treesitter', {'do': ':TSUpdate'} " Syntax and code analysis
    Plug 'p00f/nvim-ts-rainbow' " Colorful parenthesis
    Plug 'preservim/nerdtree', { 'on': 'NERDTreeToggle' } " File explorer
    Plug 'puremourning/vimspector' " Debugger integration
    Plug 'ryanoasis/vim-devicons' " Developer font icons
    Plug 'stsewd/sphinx.nvim' " Sphinx integration
    Plug 'tpope/vim-commentary' " Commenting tool
    Plug 'tpope/vim-dispatch' " Asynchronous execution
    Plug 'tpope/vim-fugitive' " Git integration
    Plug 'tpope/vim-speeddating' " Quick date navigation
    Plug 'vim-airline/vim-airline' " Visual status line indicators
    Plug 'vim-airline/vim-airline-themes' " Themes for airline
    Plug 'vim-scripts/DoxygenToolkit.vim' " Doxygen support
    Plug 'vim-scripts/SpellCheck' " Spell checking
    Plug 'vim-scripts/c.vim' " Syntax highlighting and indentation
    Plug 'vimwiki/vimwiki' " Note taking and task management
    Plug 'voldikss/vim-floaterm' " Floating terminal support
call plug#end()
The plugins we are installing here are the following plugins:
-
airblade/vim-gitgutter: A plugin that shows a git diff in the sign column, allowing you to see which lines have been added, modified, or removed compared to the git repository.
-
dense-analysis/ale: Asynchronous Lint Engine (ALE) is a plugin for providing linting, syntax checking, and automatic fixing for various programming languages.
-
dhruvasagar/vim-dotoo: A plugin that adds support for Org-mode like features to Vim, including task management, agenda views, and time tracking.
-
habamax/vim-asciidoctor: A plugin that provides syntax highlighting, folding, and other features for working with AsciiDoc files in Vim and Neovim. AsciiDoc is a plain-text markup language for writing documentation, articles, and books.
-
hrsh7th/nvim-compe: A completion plugin for Neovim that provides a lightweight and fast autocompletion experience. It integrates well with Neovim’ s built-in LSP client and other completion sources.
-
inkarkat/vim-AdvancedSorters: an advanced sorting plugin that allows you to easily sort lists of items even if these lists consist of multiple lines.
-
inkarkat/vim-ingo-library: this is the support library plugin for the advanced sorting plugin that contains shared functionality.
-
lervag/vimtex: A comprehensive set of tools for working with LaTeX files.
-
majutsushi/tagbar: A utility that provides an easy way to browse the tags of the current file and obtain an overview of its structure.
-
jceb/vim-orgmode: A plugin that attempts to replicate the functionality of Emacs’ Org mode in Vim. Org mode is a powerful note-taking and organization system that supports outlines, TODO lists, scheduling, and more.
-
mbbill/undotree: A utility that provides a visual representation of Vim’s undo history as a tree structure.
-
morhetz/gruvbox: A popular retro-inspired color scheme for Vim and Neovim.
-
neoclide/coc.nvim: Conquer of Completion (CoC) is an intelligent autocompletion plugin for Vim and Neovim. It provides support for Language Server Protocol (LSP), snippets, and various language-specific extensions.
-
neovim/nvim-lspconfig: A collection of common configurations for the built-in Neovim LSP client. This plugin makes it easy to integrate language servers for autocompletion, diagnostics, and code navigation.
-
nvim-treesitter/nvim-treesitter: A plugin that uses the Tree-sitter parsing library to provide advanced syntax highlighting, code folding, and indentation for various programming languages.
-
p00f/nvim-ts-rainbow: A plugin that uses Tree-sitter to highlight matching parentheses, brackets, and braces in different colors, making it easier to identify nested structures.
-
preservim/nerdtree: A filesystem explorer for Vim and Neovim, which allows you to navigate and manage files and directories in a tree-like interface.
-
puremourning/vimspector: A multi-language debugging plugin for Vim and Neovim that supports the Debug Adapter Protocol (DAP).
-
tpope/vim-dispatch: A plugin for asynchronously executing long-running commands (like build tools and tests) without blocking the editor.
-
tpope/vim-fireplace: A plugin for Clojure development that provides an interactive REPL and other tools for working with Clojure code.
-
tpope/vim-fugitive: A popular Git wrapper for Vim, providing commands for various Git operations like staging, committing, and browsing the repository history.
-
tpope/vim-speeddating: A plugin that allows you to quickly adjust dates in various formats using Vim’s increment/decrement functionality (
<C-a>and<C-x>). -
vim-airline/vim-airline: A lightweight and customizable status line and tab line plugin for Vim and Neovim.
-
vim-scripts/c.vim: A plugin that provides enhanced syntax highlighting, indentation, and various tools for C and C++ development.
-
vimwiki/vimwiki: A personal wiki plugin for Vim and Neovim, allowing you to create and manage notes, to-do
-
voldikss/vim-floaterm: A plugin that provides a floating terminal window inside Vim and Neovim, allowing you to run commands without leaving the editor.
Once our plugins are installed, we are not done yet. We now have to configure these plugins and this is exactly what we are going to do for the rest of this article. We are going to try to come up with a configuration that makes things very easy and makes the plugins work together as much as possible.
I like customizing my configuration and researching the options that are available. Sometimes it can be useful to turn off some completion functions for instance and if you know which options are responsible for this then it becomes easy for you to do it.
Static Analysis
Static analysis is an essential tool that you should always have in your CI pipeline. A static analyzer typically looks deeper than the compiler and can identify more potential bugs and errors - but is also slower.
What’s even better that having static analysis on your CI server is to have it in your editor and get instant feedback.
Asynchronous Lint Engine: Lint While You Type
The dense-analysis/ale (Asynchronous Lint Engine) plugin is a plugin
that provides linting and code analysis features. The plugin is designed
to work asynchronously, which means it doesn’t block the editor while
it’s processing the code. This results in a smoother and more responsive
editing experience.
Here are some key features of the ALE plugin:
-
Asynchronous linting: ALE lints your code in the background, allowing you to continue editing without any noticeable delays. This is particularly useful for large projects or slower linters.
-
Built-in support for many languages and tools: ALE supports a wide variety of languages and linters out of the box. It can automatically detect and use the appropriate linters for your project, or you can configure it manually.
-
Basic code navigation: ALE can use language servers to provide code navigation features, such as go-to-definition and find-references.
-
Fixing code automatically: ALE can automatically apply suggested fixes from linters to your code, either on a per-file basis or for the entire project.
-
Customizable interface: ALE provides various customization options, allowing you to control how linting errors and warnings are displayed in your editor. You can configure the gutter signs, line highlighting, and error messages to fit your preferences.
-
Integration with other plugins: ALE can be integrated with other popular Vim plugins, such as lightline, vim-airline, and more. In the config that I have provided I use airline.
The plugin’s GitHub repository provides detailed documentation on installation, configuration, and usage: ale usage
ALE supports a huge number of linters
and can be configured to use multiple linters for each supported file
type.
You can check current configuration for your buffer by running ALEInfo
command.
" Ignore git commit when linting (highly annoying)
let g:ale_pattern_options = {
\ 'COMMIT_EDITMSG$': {'ale_linters': [], 'ale_fixers': []}
\ }
let g:ale_linters = {
\ 'yaml': ['yamllint'],
\ 'cpp': ['clangtidy'],
\ 'c': ['clangtidy'],
\ 'asciidoc': ['cspell'],
\ 'markdown': ['cspell']
\ }
let g:ale_fixers = {
\ 'cpp': ['clang-format'],
\ 'c': ['clang-format']}
" Automatic fixing
autocmd FileType c nnoremap <leader>f <Plug>(ale_fix)
" General settings
let g:ale_linters_explicit = 1
let g:ale_completion_enabled = 1
let g:ale_echo_msg_format = '[%linter%] %s [%severity%]'
let g:ale_set_balloons=1
let g:ale_hover_to_floating_preview=1
let g:ale_use_global_executables = 1
let g:ale_sign_column_always = 1
let g:ale_disable_lsp = 1
" C++ linting
let g:ale_cpp_clangtidy_options = '-checks=-*,cppcoreguidelines-*'
let g:ale_cpp_clangtidy_checks = ['readability-*,performance-*,bugprone-*,misc-*']
let g:ale_cpp_clangtidy_checks += ['clang-analyzer-cplusplus-doc-comments']
" C linting
let g:ale_c_clangtidy_options = '-checks=-*,cppcoreguidelines-*'
let g:ale_c_clangtidy_checks = ['readability-*,performance-*,bugprone-*,misc-*']
let g:ale_c_clangtidy_checks += ['-readability-function-cognitive-complexity']
let g:ale_c_clangtidy_checks += ['-readability-identifier-length']
let g:ale_c_clangtidy_checks += ['-misc-redundant-expression']
let g:ale_c_build_dir_names = ['build', 'release', 'debug']
" This function searches for the first clang-tidy config in parent directories and sets it
function! SetClangTidyConfig()
let l:config_file = findfile('.clang-tidy', expand('%:p:h').';')
if !empty(l:config_file)
let g:ale_c_clangtidy_options = '--config=' . l:config_file
let g:ale_cpp_clangtidy_options = '--config=' . l:config_file
endif
endfunction
" Run this for c and c++ files
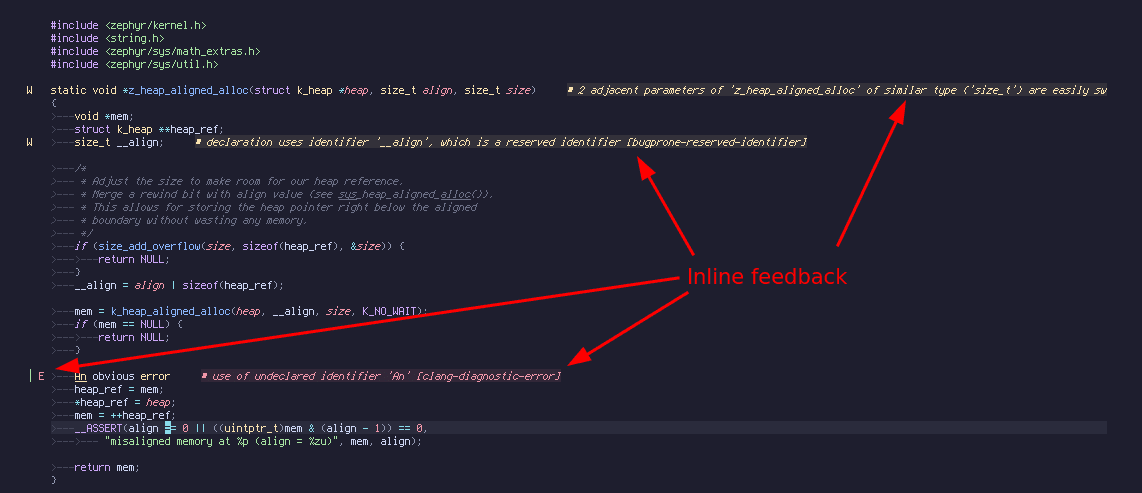
autocmd BufRead,BufNewFile *.c,*.cpp,*.h,*.hpp call SetClangTidyConfig()The result is that ALE allows us to display lint errors while we type using any means necessary (even if it involves running an external program if language server is not supported). In this way we can show linting errors for the vast majority of languages where it matters.
Linting errors in C (clang-tidy)

Linting errors in yaml (yamllint)

Linting errors in python (flake8)

Linting errors in robot (robocop)

Spell checking too (cspell)

-
Any tool that can output relevant and useful errors can be integrated
-
Not just language server tools but also standalone programs
-
ALE integrates well with other plugins such as
coc.nvimfor even more powerful setup -
See
:h alein vim for a very thorough tutorial
Completion
Over the years vim has developed several completion engines with slightly different functionalities, supported formats and features. The latest development in this area is language server protocol clients. Neovim has language server protocol built into the editor and can directly communicate with any language server that supports the protocol. The other plugins in this section provide additional completion options.
The end result of completion in vim is simply that you have ability to get feedback on code you are typing as you type it. With these completion options in place, you can enable completion for your desired file formats by simply installing and configuring an appropriate language server.
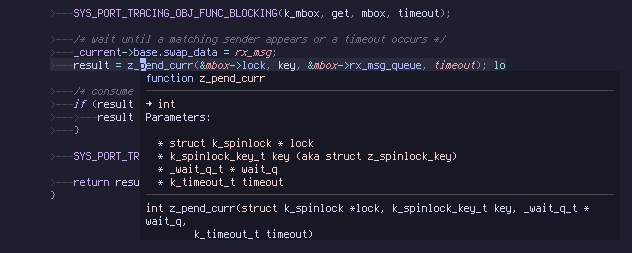
Completion of struct members:
Completion based on doxygen docs:
neoclide/coc.vim: Conquer Of Completion
The neoclide/coc.nvim is a powerful and feature-rich plugin for Neovim that
provides intellisense engine capabilities, including autocompletion, diagnostics,
linting, code actions, formatting, and more. It is built on top of the Language
Server Protocol (LSP), which allows it to support a wide variety of programming
languages by connecting to their respective language servers.
It provides features such as:
-
Autocompletion: Once you’ve installed a language server for your desired programming language,
coc.nvimwill automatically provide autocompletion suggestions as you type. -
Diagnostics:
coc.nvimcan display diagnostics (errors, warnings, and information) from the language server as you type. This helps you identify and fix issues in your code quickly. By default, diagnostics are displayed in the sign column and the virtual text area. -
Code actions: Some language servers provide code actions, which are automated solutions for common problems or enhancements. To access code actions in normal mode, type :CocAction or use the mapping
<leader>a.
These are just some of the features provided by coc.nvim. You can customize
the plugin and its behavior by configuring it in your init.vim or using various
commands and mappings. For more information and advanced usage, check the
official documentation: https:
I uses coc.nvim primarily together with clangd language server. In my vim
setup I have connected the K key to an information function the pops up
coc.nvim based information:
let g:coc_global_extensions = ['coc-clangd']
let g:clangd_install_prefix = '/usr/'
let g:clangd_command = ['clangd',
\   '--clang-tidy',
\   '--background-index',
\   '--header-insertion-decorators=0',
\   '--completion-style=detailed']

nnoremap <silent> K :call <sid>show_documentation()<cr>
function! s:show_documentation()
    if index(['vim', 'help'], &filetype) >= 0
        execute 'help ' . expand('<cword>')
    elseif &filetype ==# 'tex'
        VimtexDocPackage
    else
        call CocAction('doHover')
    endif
endfunction
hrsh7th/nvim-compe: autocompletion as you type
The hrsh7th/nvim-compe plugin provides auto-completion functionality. It is
designed specifically for Neovim, leveraging its built-in LSP (Language Server
Protocol) support and other features unique to Neovim.
Here are some key features of hrsh7th/nvim-compe:
-
Auto-completion: nvim-compe offers context-aware auto-completion suggestions as you type. It sources completion items from various sources such as LSP, snippets, buffer words, and more.
-
Customization: The plugin allows you to configure and prioritize completion sources, as well as tweak other settings to fit your preferences.
-
Integration: nvim-compe is compatible with several other Neovim plugins, such as nvim-lspconfig and vim-vsnip, providing a seamless experience when working with code.
-
Performance: The plugin is designed to be lightweight and fast, ensuring that your Neovim setup remains responsive even when handling large code bases.
Here is how I have configured this plugin in my vim configuration. The
completeopt line is necessary to enable proper navigation in the completion
menu.
set completeopt=menuone,noselect
let g:compe = {}
" Enable or disable the nvim-compe plugin
let g:compe.enabled = v:true
" Enable or disable automatic completion popup when typing.
let g:compe.autocomplete = v:true
" Enable or disable debug messages.
let g:compe.debug = v:false
" Minimum number of characters that must be entered before completion suggestions are shown.
let g:compe.min_length = 1
" Preselect behavior for completion items.
let g:compe.preselect = 'enable'
" Throttle time (in milliseconds) for completion requests to avoid overwhelming the system.
let g:compe.throttle_time = 80
" Timeout (in milliseconds) for each completion source.
let g:compe.source_timeout = 200
" Timeout (in milliseconds) for resolving completion items.
let g:compe.resolve_timeout = 800
" Delay (in milliseconds) for showing completion items when the completion is incomplete.
let g:compe.incomplete_delay = 400
" Maximum width of abbreviation in the completion menu.
let g:compe.max_abbr_width = 100
" Maximum width of kind (type) in the completion menu.
let g:compe.max_kind_width = 100
" Maximum width of the entire completion menu.
let g:compe.max_menu_width = 100
" Enable or disable documentation preview for completion items.
let g:compe.documentation = v:true
" Enable individual completion sources
let g:compe.source = {}
let g:compe.source.buffer = v:true
let g:compe.source.calc = v:true
let g:compe.source.emoji = v:true
let g:compe.source.luasnip = v:true
let g:compe.source.nvim_lsp = v:true
let g:compe.source.nvim_lua = v:true
let g:compe.source.path = v:true
let g:compe.source.spell = v:true
let g:compe.source.tags = v:true
let g:compe.source.treesitter = v:true
let g:compe.source.ultisnips = v:true
let g:compe.source.vsnip = v:false

inoremap <silent><expr> <C-Space> compe#complete()
inoremap <silent><expr> <CR>      compe#confirm('<CR>')
inoremap <silent><expr> <C-e>     compe#close('<C-e>')
inoremap <silent><expr> <C-f>     compe#scroll({ 'delta': +4 })
inoremap <silent><expr> <C-d>     compe#scroll({ 'delta': -4 })
neovim/nvim-lspconfig: language server configuration
The neovim/nvim-lspconfig plugin is a collection of common
configurations for the built-in Language Server Protocol (LSP) client in
Neovim. LSP provides a standardized way for text editors and IDEs to
interact with language servers such as clangd that offer features such
as code completion, syntax checking, refactoring, and more. The
nvim-lspconfig plugin makes it easy to set up and configure language
servers for various programming languages in Neovim.
Using nvim-lspconfig, you can quickly enable support for code
completions of many different programming languages in Neovim by simply
installing the corresponding language server and adding a few lines to
your Neovim configuration file (init.vim or init.lua). The plugin takes
care of setting up the LSP client with sensible defaults and provides an
interface for customizing the configuration as needed.
Key features of the neovim/nvim-lspconfig plugin include:
-
Easy configuration of language servers for various programming languages.
-
Automatic setup of LSP features, such as completion, diagnostics, and code actions.
-
Support for customizing LSP settings and keybindings.
Out of the box the plugin does not setup all the language servers. You have to do this yourself depending on which language servers you want to use. It is also a good idea to setup key bindings for common code completion functions to keys that make sense for you.
Below is a configuration that sets up LSP for Vim script, docker and languages supported by clangd (C, C++, ObjectiveC and possibly others)
lua << EOF
local lspconfig = require'lspconfig'
lspconfig.vimls.setup {}
lspconfig.dockerls.setup {}
lspconfig.clangd.setup{
    on_attach = function(client, bufnr)
        require'completion'.on_attach(client, bufnr)
    end,
    flags = {
        debounce_text_changes = 150,
    },
    cmd = { "clangd", "--background-index" },
    filetypes = { "c", "cpp" },
}
lspconfig.robotframework_ls.setup({})

-- Use LspAttach autocommand to only map the following keys
-- after the language server attaches to the current buffer
vim.api.nvim_create_autocmd('LspAttach', {
  group = vim.api.nvim_create_augroup('UserLspConfig', {}),
  callback = function(ev)
    -- Enable completion triggered by <c-x><c-o>
    vim.bo[ev.buf].omnifunc = 'v:lua.vim.lsp.omnifunc'

    -- Buffer local mappings.
    -- See `:help vim.lsp.*` for documentation on any of the below functions
    local opts = { buffer = ev.buf }
    vim.keymap.set('n', 'gD', vim.lsp.buf.declaration, opts)
    vim.keymap.set('n', 'gd', vim.lsp.buf.definition, opts)
    vim.keymap.set('n', 'K', vim.lsp.buf.hover, opts)
    vim.keymap.set('n', 'gi', vim.lsp.buf.implementation, opts)
    vim.keymap.set('n', '<C-k>', vim.lsp.buf.signature_help, opts)
    vim.keymap.set('n', '<space>wa', vim.lsp.buf.add_workspace_folder, opts)
    vim.keymap.set('n', '<space>wr', vim.lsp.buf.remove_workspace_folder, opts)
    vim.keymap.set('n', '<space>wl', function()
      print(vim.inspect(vim.lsp.buf.list_workspace_folders()))
    end, opts)
    vim.keymap.set('n', '<space>D', vim.lsp.buf.type_definition, opts)
    vim.keymap.set('n', '<space>rn', vim.lsp.buf.rename, opts)
    vim.keymap.set({ 'n', 'v' }, '<space>ca', vim.lsp.buf.code_action, opts)
    vim.keymap.set('n', 'gr', vim.lsp.buf.references, opts)
    vim.keymap.set('n', '<space>f', function()
      vim.lsp.buf.format { async = true }
    end, opts)
  end,
})
This configuration should be enough to get you started.
AI Integration
Using latest AI developments we can greatly accelerate how fast we work. I have chosen to include OpenAI integration because at the time of this writing OpenAI provides a far better service than anyone else out there. OpenAI ChatGPT is easily ~1000 times better than google - with the only drawback that it’s data is often out of date.
Here is an example:
madox2/vim-ai: integration with OpenAI
The madox2/vim-ai provides integration with OpenAI API directly in Vim making it possible to create more advanced queries than you can normally do through the ChatGPT public interface.
I find that this plugin is the most no-bs interface to OpenAI API without any unnecessary bells and whistles. It does what it should do. The rest you do with Vim by editing the text you send to it.
To use vim-ai you will need to get an OpenAI API key. The process is the same for all OpenAI integrations so see their documentation on how to do it.
This plugin provides two main functions:
-
:AI <prompt>- this generates text in response to the prompt and pastes it into the current buffer. -
:AIChat- this opens up a chat window where you can execute an ongoing chat session with OpenAI. This splits your input into “system”, “user” and “assistant” type of queries and makes sure that the session works as closely as possible to the web based ChatGPT client.
There is another function called “:AIEdit” but I haven’t had good results with it.
My favorite is the :AIChat command.
When you run :AIChat command the chat window pops up. Here you can enter ”>>>
system” to set the system query and you can modify the content of this window as
you wish (which is slightly better than interacting with the OpenAI web
interface).
Example:
>>> system

You are a standup comedian by the name of Chris Rock. You have a sarcastic sense of humor.

>>> user

Write me a joke about embedded firmware development on windows

<<< assistant

Embedded firmware development on Windows? That's like trying to build a sandcastle in the middle of
a hurricane. Good luck trying to get anything done without being constantly interrupted by a barrage
of notifications, updates, and crashes. It's enough to make even the most patient developer throw
their computer out the window... which is probably the safest place for it anyway.

>>> user
This is just a very simple example. There is so much more we can do with language models to accelerate embedded firmware development. Just have a look at AutoGPT and the prompt it uses: https:
Git Integration
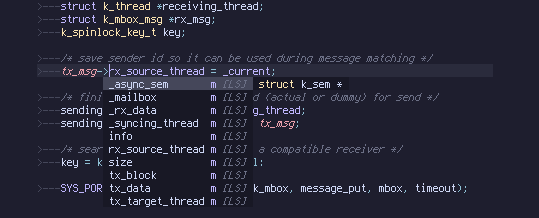
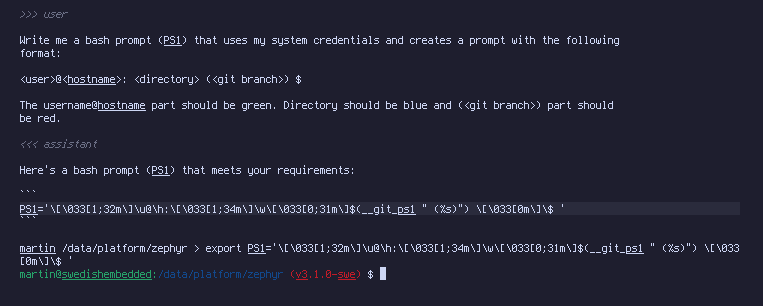
The git integration in Vim allows you to work seamlessly with git directly from Vim. This has the benefit that you can stage and commit partial text very easily and view git information (such as diff) directly as you type without having to open up a third party tool.

The git blame functionality allows you to view who committed current changes to each line of the file as you type:

tpope/vim-fugitive: git integration
Vim-fugitive is a Vim plugin that provides seamless integration with the Git version control system. It allows users to perform Git commands directly from within Vim, such as committing, pushing, and pulling. It also provides a number of useful features such as syntax highlighting for Git commands, and the ability to quickly view diffs and blame information.
-
Enables executing Git commands directly from within Vim.
-
Provides syntax highlighting for Git commands.
-
Allows users to easily view diffs and blame information.
-
Provides seamless integration with the Git version control system for Vim users.
-
Offers a wide range of useful Git-related features, such as committing, pushing, and pulling.
In my config I have the following settings:
nnoremap <Leader>gg :Git<CR>
nnoremap <Leader>gs :Git status<CR>
nnoremap <Leader>gc :Git commit<CR>
nnoremap <Leader>gb :Git blame<CR>
nnoremap <Leader>gd :Git difftool<CR>
nnoremap <Leader>gm :Git mergetool<CR>
nnoremap <Leader>gdv :Gvdiffsplit<CR>
nnoremap <Leader>gdh :Gdiffsplit<CR>-
<Leader>gg: opens a Git status window in an interactive window, similar tolazygit. -
<Leader>gs: shows the output ofgit status. -
<Leader>gc: opens a commit window where users can write and save a commit message. -
<Leader>gb: opens a Git blame window for the current file. -
<Leader>gd: opens a difftool for the current file. -
<Leader>gm: opens a mergetool for the current file. -
<Leader>gdv: opens a diff of the current file in a vertical split. -
<Leader>gdh: opens a diff of the current file in a horizontal split.
lewis6991/gitsigns.nvim: display git status for each line
lewis6991/gitsigns.nvim is a Neovim plugin written in Lua that provides Git
integration for Neovim. It shows Git status information in the sign column (next
to the line numbers) with customizable symbols.
The following indicators are supported:
-
Added lines
-
Modified lines
-
Removed lines
-
Changed lines not staged for commit
-
Untracked files
airblade/vim-gitgutter: git status reporting line by line
The airblade/vim-gitgutter plugin is a utility that provides live, on-the-fly
visual feedback about the changes you’ve made to a file in a Git repository. It
shows insertions, modifications, and deletions in the sign column (the area to
the left of the line numbers) and provides additional functionality related to
handling Git diffs.
Some features of the airblade/vim-gitgutter plugin include:
-
Displaying signs in the sign column to indicate added, modified, or deleted lines compared to the latest Git commit.
-
Providing a way to navigate between hunks (groups of changes) using provided mappings or custom keybindings.
-
Allowing you to stage, undo, or preview individual hunks directly from the editor.
-
Supporting customization of the appearance of signs, colors, and symbols.
-
Automatically updating the signs as you edit the file, with configurable update intervals for better performance.
-
Integrating with Vim’s native fold system to fold unchanged text around modified sections.
Once installed, the plugin will automatically display Git diff information in the sign column for files in a Git repository. You can customize the appearance and behavior of the plugin by adding relevant configuration options to your Vim configuration file.
The configuration that I have created for this tutorial provides the following key bindings:
-
<leader>gs: stage current hunk or selected region if in visual mode -
<leader>gu: undo hunk -
<leader>gn: Jump to the next hunk -
<leader>gp: Jump to the previous hunk -
<leader>gh: Preview the changes in the current hunk
UI Enhancements
The UI enhancements in this section basically give you a very nice UI. This includes the colorscheme, file browser, status line and tab line.
preservim/nerdtree: the battle tested file explorer
The preservim/nerdtree plugin is my favorite file explorer for Vim and Neovim.
It provides a tree view of all files as well as options to filter this list and
create/delete/rename files using vim commands.
With an extensive range of features and customizable options, NERDTree provides a convenient and efficient way to interact with your project files.
The key features of NERDTree include:
-
Tree view: a sidebar with a hierarchical view of your filesystem, making it easy to navigate through directories and find files.
-
File operations: Perform common file management tasks like creating, renaming, deleting, and moving files and directories directly from the NERDTree interface.
-
Bookmarking: Bookmark frequently accessed directories or files for quick access.
-
Filetype icons: Display filetype-specific icons next to files, providing a visual cue for the file type.
-
Plugin integration: Integrate with other Vim and Neovim plugins, such as vim-airline for displaying NERDTree status in the status line or
vim-deviconsfor adding custom icons to the file tree. -
Git integration: NERDTree can also show git status (modified, untracked, etc.) of files and directories with the help of additional plugins like Xuyuanp/nerdtree-git-plugin.
Here is my configuration of nerdtree:
let g:NERDTreeWinSize = 40
nnoremap <C-n> :NERDTreeToggle<CR>
let NERDTreeIgnore = ['\.o$', '\.obj$', '\.a$', '\.so$', '\.out$', '\.git$']
let NERDTreeShowHidden = 1
Basically we want to set the tree width to 40 chars, ignore build artifacts and show hidden files.
catppuccin/nvim: the visually appealing colorscheme
This is a nice colorscheme with carefully chosen colors for various syntax elements and UI components.
akinsho/bufferline.nvim: tabs at the top of the window
The akinsho/bufferline.nvim is a Neovim plugin that provides a customizable
buffer line, allowing you to quickly navigate between open buffers and see their
status. It is built using Neovim’s built-in :h ‘tabline’ functionality and
requires Neovim 0.5 or newer.
Here are a few things you can do with this plugin:
-
Display open buffers: See a list of all your open buffers in the buffer line at the top of your Neovim window.
-
Navigate between buffers: Quickly switch between open buffers by clicking on buffer names in the buffer line.
-
Close buffers: Close open buffers directly from the buffer line by clicking on the close icon.
-
Buffer indicators: Show modified and read-only status indicators on the buffer line to quickly identify buffer states.
-
Buffer grouping: Group buffers by directory or other custom criteria, making it easier to manage a large number of buffers.
You can combine bufferline.nvim with plugins like nvim-web-devicons to add
beautiful icons to the bufferline as well.
majutsushi/tagbar: the ultimate tag bar
The majutsushi/tagbar plugin is a utility that provides an easy way to browse
the tags of the current file and obtain an overview of its structure. The plugin
displays a sidebar with the tags organized in a hierarchical manner, allowing
you to navigate and understand your code’s structure more efficiently.
Tags can be elements such as classes, functions, methods, variables, and other code structures that can be indexed for quick navigation. The tagbar plugin uses the ctags tool (or compatible alternatives) to generate tags for a wide range of programming languages.
The beauty of this plugin is that it works not just on C code but also on other types of files such as vim scripts, python scripts, html files and more.
Some features of the majutsushi/tagbar plugin include:
-
Displaying tags in a separate sidebar, making it easy to see the structure of the current file at a glance.
-
Sorting tags by their scope or appearance in the file.
-
Allowing you to jump to the location of a tag in the source code by simply clicking or pressing Enter on the tag in the sidebar.
-
Supporting customizable tag icons and color schemes.
-
Providing an extensible interface for adding support for additional languages or customizing the behavior for existing languages.
To use the majutsushi/tagbar plugin, ensure you have a compatible version of
ctags installed on your system. This should be automatically installed by the
Swedish Embedded Workstation setup script mentioned in the beginning of this
article.
Once configured, you can open the tagbar sidebar by running the :TagbarToggle
command, or you can map a keybinding to toggle the sidebar. This is bound to
F8 key in this tutorial.
nmap <F8> :TagbarToggle<CR>This will pop up the tagbar.
mbbill/undotree: quick undo access
The mbbill/undotree plugin is a utility that provides a visual representation
of Vim’s undo history as a tree structure. It allows you to navigate, explore,
and manage your editing history more effectively, offering a convenient way to
undo and redo changes, branch off to different editing paths, and compare buffer
states.
Vim already has a powerful undo system that stores changes in a tree-like structure, enabling you to branch off and switch between different editing paths. The undotree plugin brings this capability to the forefront by visualizing the undo tree in a separate sidebar.
Some features of the mbbill/undotree plugin include:
-
Visualizing the undo tree in a separate sidebar, making it easy to navigate and understand your editing history.
-
Allowing you to jump to any point in the undo tree by simply clicking or pressing Enter on a node in the sidebar.
-
Providing a diff window that shows the differences between the current buffer state and the state you’re about to jump to, helping you understand the changes you made.
-
Supporting session persistence, which means you can save and restore undo history across Vim sessions.
-
Customizable key mappings, appearance, and behavior.
Once installed and enabled, you can open the undo tree sidebar by running the : UndotreeToggle command, or you can map a keybinding to toggle the sidebar.
In Swedish Embedded Workstation file this command is bound to F5 key.
nmap <F5> :UndotreeToggle<CR>This will popup the undo tree in the sidebar.
When the UndoTree window is open, use the following the hjkl keys to navigate the tree:
As you navigate the tree, the main buffer will show the selected version of the file. To apply the changes and update the buffer, press Enter while the desired node is highlighted in the UndoTree window.
You can enable diff mode to see the differences between the current version of
the file and the selected version in the undo tree. To toggle diff mode, press
D in the UndoTree window.
To show timestamps for each change in the undo tree, press t in the UndoTree
window. Pressing t again will hide the timestamps.
vim-airline/vim-airline: the status line for vim
Vim-airline is a plugin designed to enhance the status line under your buffer.
Some of its key features include:
-
Beautiful design: Vim-airline provides a sleek and modern status line that is both functional and visually appealing.
-
Customizable: You can customize the appearance of your status line to fit your personal preferences, including fonts, colors, and icons. The airline themes package provides many nice themes.
-
Informative: Vim-airline displays relevant information such as the file type, line and column number, and Git branch, making it easy to track your progress while editing.
-
Integration: Vim-airline integrates seamlessly with other popular Vim plugins, such as vim-fugitive and spell checking providing a very nice editing experience.
I like the ‘deus’ theme:
let g:airline_powerline_fonts = 1
let g:airline_theme = 'deus'
voldikss/vim-floaterm: floating terminal
The voldikss/vim-floaterm creates a floating terminal window within Vim. This
plugin is especially useful when you need to pop up a quick terminal.
I have created a set of custom mappings for this plugin because I didn’t like how it was difficult to close the terminal. In my mappings the terminal can be closed using escape key even if you are in insert mode.
nnoremap <C-t> :FloatermToggle!<CR>
augroup FloatermMapping
    autocmd!
    autocmd FileType floaterm nnoremap <buffer> <Esc> <C-\><C-n>:FloatermToggle<CR>
    autocmd FileType floaterm inoremap <buffer> <Esc> <C-\><C-n>:FloatermToggle<CR>
augroup end
tnoremap <Esc> <C-\><C-n>:FloatermToggle<CR>
File Formats
Additional file format plugins can be installed to get features like folding for additional file formats if this functionality is not well supported yet by default. I find that in particular the asciidoctor plugin provides nice code folding although a little buggy sometimes..

habamax/vim-asciidoctor: Asciidoctor tools for vim
The habamax/vim-asciidoctor plugin is designed to provide syntax highlighting,
filetype detection, folding and other enhancements for working with AsciiDoc
files in Vim. AsciiDoc is a lightweight markup language for writing
documentation, articles, books, and more. In fact, this tutorial is written in
asciidoc.
The plugin offers a range of features that make it easier and more efficient to work with AsciiDoc files.
Features provided by the habamax/vim-asciidoctor plugin include:
-
Syntax highlighting: The plugin offers syntax highlighting support for AsciiDoc files, making it easier to read and write documents. It highlights headings, lists, tables, links, and other elements, giving you a clear visual representation of the document’s structure. One neat feature is that it can also highlight other languages included in the file as you type.
-
File type detection: The plugin automatically detects AsciiDoc files based on their file extensions, such as .adoc, .asc, and .asciidoc. This means that when you open an AsciiDoc file, Vim or Neovim will automatically enable the AsciiDoc filetype and apply the appropriate settings, such as syntax highlighting and indentation rules.
-
Folding: The plugin supports folding for AsciiDoc files, allowing you to collapse and expand sections based on the document structure. This makes it easier to navigate and focus on specific parts of the document.
Note that folding and source block highlighting is not enabled by default so we have to enable it in the vim config.
My configuration for this plugin looks like this:
let g:asciidoctor_folding = 1
let g:asciidoctor_fold_options = 1
let g:asciidoctor_fenced_languages = ['vim', 'sh', 'python', 'c', 'javascript']
Note that asciidoc folding seems to be a bit buggy in neovim right now sometimes folding multiple sections into one.
nvim-treesitter/nvim-treesitter: Syntax highlighting
The nvim-treesitter/nvim-treesitter is a Neovim plugin that leverages the
Tree-sitter parsing library to provide advanced features for many different
programming languages and file formats. It is based on tree-sitter library which
is a modern, incremental parsing system that allows for syntax highlighting,
code folding, indentation, and other features to be implemented more accurately
and efficiently compared to traditional regex-based methods.
Here are some of the main features provided by nvim-treesitter:
-
Syntax highlighting: The plugin provides accurate and fast syntax highlighting for many programming languages. The highlighting is based on the syntax tree, which is more reliable than regex-based methods.
-
Code folding:
nvim-treesittercan automatically define folds based on the structure of the syntax tree, leading to more meaningful and consistent folding regions. -
Indentation: The plugin can automatically indent code based on the syntax tree, providing more accurate and language-specific indentation.
-
Text objects:
nvim-treesitterprovides text objects based on the syntax tree, allowing for more precise and language-aware text manipulation. -
Refactoring: The plugin offers refactoring tools such as renaming variables, extracting functions, or changing function signatures, which take advantage of the syntax tree for more accurate results.
-
Code navigation: With
nvim-treesitter, you can quickly navigate to definitions, references, and other symbols within your codebase.
To see which languages you have installed you can run the :TSInstallInfo
command. To install new language support you can run :TSUpdate <lang>.
nvim-treesitter needs to be setup and configured in your vim initialization
script using Lua:
-- Treesitter configuration
require('nvim-treesitter.configs').setup {
    highlight = {
        enable = true,
    },
    ensure_installed = {'org'},
}
That’s it!
lervag/vimtex: for working with LaTeX documents
The lervag/vimtex plugin is a comprehensive plugin for working with LaTeX
documents in vim.
It provides:
-
Syntax highlighting:
lervag/vimtexprovides enhanced syntax highlighting for LaTeX documents out of the box. You don’t need to do anything special to enable it. -
Autocompletion: it integrates with Vim’s built-in completion mechanism and other popular completion plugins, such as
coc.nvimandnvim-compe. -
Folding: Vimtex automatically sets up folding for LaTeX documents based on sections, environments, and other elements. To open or close folds, use the default Vim folding commands, such as zo to open a fold and zc to close a fold.
-
Document compilation: Vimtex provides commands to compile your LaTeX document. The most basic command is :VimtexCompile, which compiles the document using the default latexmk tool. You can stop the compilation with : VimtexStop.
-
Document viewer: Vimtex automatically integrates with several popular PDF viewers (e.g., zathura, okular, and evince) for viewing compiled documents. Use the command
:VimtexViewto open the PDF in your preferred viewer. -
Error handling: Vimtex parses LaTeX errors and warnings and integrates with Vim’s quickfix list. You can use
:VimtexErrorsto show the list of errors and :cnext/:cprev to navigate between them. -
Motion and text objects: Vimtex adds custom motions and text objects for navigating and manipulating LaTeX documents. For example, you can use
]]and[[to jump between sections, and ae to select an environment. -
Commands and mappings: Vimtex provides many commands and mappings for working with LaTeX documents. For example, you can use
:VimtexTocOpento open a table of contents and:VimtexInfoto show information about the current document.
To make the most of the Vimtex plugin, see its comprehensive documentation by
running :help vimtex in Vim. The documentation provides detailed explanations
of each feature, along with examples and customization options.
Debugging
For debugging support I usually use gdb-dashboard
While GDB dashboard is not a Vim plugin I find that working directly in GDB is nicer than using any kind of plugins. Although if you do want to use plugins then vimspector is probably the best choice.
puremourning/vimspector: a powerful and feature rich debugging
The puremourning/vimspector plugin is a powerful and feature-rich debugger
integration for Vim and Neovim. Vimspector provides a modern, unified debugging
interface within the Vim environment, allowing you to interact with various
debugger backends through the Debug Adapter Protocol (DAP).
This means that it works for any target that supports GDB.
The key features of Vimspector include:
-
Multi-language debugging: Vimspector works with a wide range of programming languages, including Python, JavaScript, Go, Ruby, and C/C++, by using different debug adapters.
-
Debug Adapter Protocol (DAP): DAP is a common interface between debuggers and development environments. Vimspector communicates with the debugger using DAP, making it easier to add support for new languages or debuggers.
-
Breakpoints: you can set, disable, and remove breakpoints, as well as set conditional breakpoints and logpoints directly from the vim interface.
-
Stepping and execution control: Vimspector enables standard debugging features such as step-over, step-in, step-out, and continue execution, providing fine control over the program’s execution flow directly from the buffer window.
-
Variables and watches: allows you to inspect local and global variables, and to create watches for specific variables or expressions.
-
Call stack and threads: you can navigate through the call stack and switch between threads when debugging multi-threaded applications.
Vimspector is great if you are looking for a comprehensive debugging solution within Vim. It brings a robust set of debugging features to the Vim environment, simplifying the debugging process and enhancing productivity.
To configure Vimspector for embedded debugging you would typically launch it in
the debugserver mode. To do this you need to create a configuration file
.vimspector.json in your project root and setup a debugging configuration for
remote debugging:
{
    "configurations": {
        "remote": {
            "adapter": "vscode-cpptools",
            "configuration": {
                "request": "launch",
                "program": "${workspaceRoot}/build/zephyr/zephyr.elf",
                "MIMode": "gdb",
                "miDebuggerPath": "/usr/bin/gdb-multiarch",
                "miDebuggerServerAddress": ":3333",
                "cwd": "${workspaceRoot}",
                "externalConsole": false
            }
        },
        "local": {
            "adapter": "vscode-cpptools",
            "configuration": {
                "request": "launch",
                "program": "${workspaceRoot}/build/zephyr/zephyr.elf",
                "cwd": "${workspaceRoot}",
                "externalConsole": true
            }
        }
    }
}
Now install the backend:
:VimspectorInstall vscode-cpptoolsThis sets up a local and remote debugging configurations. You would want to use local if you are building native posix tests. Remote configuration is used when debugging using Renode or over JTAG on a real target.
Once configured, you can also configure key mappings. I prefer to keep the keymappings as similar to GDB as possible:
nnoremap <Leader>dd :call vimspector#Launch()<CR>
nnoremap <Leader>dx :call vimspector#Reset()<CR>
nnoremap <Leader>db :call vimspector#ToggleBreakpoint()<CR>
nnoremap <Leader>dc :call vimspector#Continue()<CR>
nnoremap <Leader>ds :call vimspector#StepInto()<CR>
nnoremap <Leader>dn :call vimspector#StepOver()<CR>
nnoremap <Leader>df :call vimspector#StepOut()<CR>
That’s it. This gives you debugging in vim as well.
Task Management
Text based task management is all about leveraging the text editing functionality such as folding, sorting and quick editing together with specialized functions like time sheet support and scheduling to create a powerful task management system.
One of the best such systems of text based task management is Emacs Org mode. Unfortunately Vim doesn’t have anything that is as complete as org mode (and nothing else besides Emacs itself does) but there are ways to get the basic functionality in place.
nvim-orgmode/orgmode: organizing tasks in vim
The nvim-orgmode/orgmode plugin brings Emacs Org Mode to Neovim. Org Mode is a
popular Emacs major mode for organizing tasks, notes, and writing in a
plain-text format. It provides a versatile system for outlining, project
management, and more. The nvim-orgmode/orgmode plugin aims to replicate Org
Mode’s functionality within Neovim, using Lua for implementation.
Key features of the nvim-orgmode/orgmode plugin include:
-
Outlining: Org Mode supports a hierarchical structure with headings, subheadings, and folded content. This allows you to organize your notes, tasks, and ideas in a clear and structured manner.
-
Task management: Org Mode enables you to manage tasks with TODO keywords, deadlines, and scheduling. It also provides features for tracking task progress, priorities, and effort estimates.
-
Agenda view: Org Mode offers an agenda view that consolidates tasks, deadlines, and scheduled items from multiple files, making it easy to get an overview of your tasks and plan your work.
-
Timestamps and time tracking: Org Mode supports timestamps for scheduling, deadlines, and clocking time spent on tasks.
-
Customizable and extensible: Org Mode allows you to customize and extend its functionality using Emacs Lisp. The nvim-orgmode/orgmode plugin similarly enables customization and extension using Lua.
The nvim-orgmode/orgmode plugin is still under active development, and some
features of Emacs Org Mode may not yet be fully implemented or may have limited
functionality. However, the plugin is continuously being improved and updated.
To use this plugin you need to run lua configuration in your init script:
-- Load custom treesitter grammar for org filetype
require('orgmode').setup_ts_grammar()

require('orgmode').setup({
    org_agenda_files = {'~/board.org'},
    org_default_notes_file = '~/refile.org',
})
This will configure and setup the plugin so all key bindings described in the documentation will work.
dhruvasagar/vim-dotoo: vim time and task management
The dhruvasagar/vim-dotoo plugin is a plugin designed to replicate the core
features of Emacs Org-mode, specifically focusing on its to-do list and task
management capabilities. With vim-dotoo, you can manage tasks, set deadlines,
track progress, and clock time spent on tasks directly within Vim/Neovim.
Here are some key features of the vim-dotoo plugin:
-
Tasks and to-do lists: You can create tasks with different states, such as TODO, STARTED, DONE, etc. You can also create hierarchical task lists, allowing you to organize tasks under projects or categories.
-
Task scheduling and deadlines: You can set scheduled dates and deadlines for tasks, making it easy to track and prioritize your work.
-
Task properties: You can add custom properties to tasks, such as tags, priority levels, or any other metadata you find useful.
-
Clocking time: You can clock in and clock out of tasks to track the time you spend working on them. This feature helps you analyze your productivity and time management.
-
Agenda view: The plugin provides an agenda view that displays your scheduled tasks and deadlines in a calendar-like format, giving you an overview of your upcoming work.
-
Task search and filtering: You can search and filter tasks based on various criteria, such as task state, tags, deadlines, or custom properties.
Personally, I’m only been evaluating this plugin as a complement to Vim org-mode plugin. Ideally I would like vim orgmode to be a full implementation of org mode so that I can do proper time tracking in vim-orgmode instead.
At the time of this writing, vim-orgmode does not support clocking and scheduling and neither does it support deadlines which makes this plugin essential if using Vim. However, it could be better to simply use emacs with proper org mode on the side than to try to do it in vim.
Editing Tools
Sometimes it’s nice to have additional editing functionality. For instance recently I wanted to sort text blocks by prefix and I did not find anything out of the box to do it. Luckily the AdvancedSorters plugin was able to do it quite nicely.
Besides sorting, there are additional ways you can enhance vim using tools for comments, doxygen, shell command dispatching and smart date editing. In this section we will cover these tools.
vim-scripts/DoxygenToolkit.vim: doxygen helper
The DoxygenToolkit.vim is a very simple script that simplifies the process of
writing documentation for C functions.
It provides the :Dox command that generates Doxygen comments based on the
current context under the cursor. It automatically detects the type of code
element (function, variable, class, etc.) and inserts the appropriate Doxygen
tags.
inkarkat/vim-AdvancedSorters: advanced sorting for vim
The inkarkat/vim-AdvancedSorters is a plugin that enhances Vim’s built-in
sorting capabilities. It allows you to perform more complex and flexible sorting
operations on your text. The plugin provides several additional features and
sorting options that are not available with Vim’s default :sort command.
Some of the key features of the inkarkat/vim-AdvancedSorters plugin include:
-
Custom comparison functions: You can use your own custom comparison functions to sort lines according to specific criteria. This is particularly useful for sorting complex data structures or lists with folded lines.
-
Sorting on multiple fields: The plugin allows you to sort lines based on multiple fields within each line, which can be particularly useful when working with structured data, like CSV files or log entries.
-
Flexible pattern matching: You can use regular expressions to define the fields to sort on. This allows for greater flexibility in specifying the sorting criteria.
This plugin is most useful when you need to do sorting operations that require complex behavior such as sorting blocks of text, sorting C functions in a file, sorting sections in an asciidoc document etc.
For example I can sort my asciidoc folds by folding the asciidoc document, visually selecting the folds I want to sort and then typing:
:'<,'>SortVisible /^== /For more information about this plugin you can checkout its documentation: here
jeetsukumaran/vim-buffergator: a buffer sidebar
The jeetsukumaran/vim-buffergator is a buffer manager and explorer plugin. It
allows you to easily navigate, preview, and manipulate your open buffers. With
vim-buffergator, you can quickly switch between buffers, close them, or perform
other operations in an intuitive and efficient way.
Once you’ve installed the plugin using a plugin manager like vim-plug, you can configure and use vim-buffergator as follows:
Configure your key mappings:
nmap <silent> <leader>bb :BuffergatorOpen<CR>
nmap <silent> <leader>bB :BuffergatorOpenInTab<CR>
Once the buffer list is open, you can use the following key mappings to navigate and manipulate your buffers:
-
j/k: Move up/down the list of buffers. -
<CR>: Open the selected buffer in the current window. -
s: Open the selected buffer in a new horizontal split. -
v: Open the selected buffer in a new vertical split. -
t: Open the selected buffer in a new tab. -
dd: Delete the selected buffer (i.e., close it). -
u: Update the buffer list.
tpope/vim-commentary: quick commenting
This is a lightweight and efficient Vim plugin for quickly commenting and uncommenting lines or blocks of code. The plugin is language-aware and supports various commenting styles for different programming languages and file formats. It streamlines the process of commenting code by providing simple, intuitive commands that integrate seamlessly with Vim’s native motions and text objects.
The only drawback of this plugin is that it does not use block comments (and does so on purpose) but this is not really an issue because you only use it for quick commenting and uncommenting of code during work.
Key features of vim-commentary include:
-
Comment/Uncomment: Easily comment or uncomment single lines or blocks of code with just a few keystrokes, using the
gcoperator. This means that you can append vim motion commands to comment multiple lines - for examplegc2jwould comment current line and 2 lines down. -
Line-wise and block-wise commenting: Use
gcin combination with Vim’s native motions and text objects to comment line-wise or block-wise, depending on the context - for examplegcapcomments out a paragraph. -
Language-aware: Automatically detects the appropriate commenting style for the current file type, ensuring consistent and correct commenting across different programming languages and file formats.
-
Repeat with dot: Using Vim’s native operations you can repeat the same commenting command multiple times using for example the dot operator.
tpope/vim-dispatch: run background commands
The tpope/vim-dispatch plugin is a versatile tool that allows you to run
commands asynchronously in the background while continuing to work in Vim. It’s
particularly useful for long-running tasks, such as running tests, building
projects, or executing shell commands, without blocking the editor’s interface.
Here are some things you can do with this plugin:
-
Run tests asynchronously: Run your test suite in the background while continuing to work on your code.
-
Build projects without blocking: Compile or build your project without waiting for the process to finish, freeing you to continue editing your code.
-
Execute shell commands: Run shell commands in the background and get notified when they finish.
-
View command output in a separate window: See the output of your background commands in a separate quickfix window without leaving your current buffer.
-
Run commands in a terminal multiplexer:
vim-dispatchcan automatically use tmux to run the job and then retrieve the results into the quickfix window.
There are several ways to dispatch commands from Vim and if you are running vim
inside tmux (which I do) then things are even easier. You can simply dispatch
directly to a tmux pane using tmux terminal commands. For example: tmux send-keys -t "2" C-z 'ls -la' Enter would send the command to the tmux pane.
This method is a more advanced way but even more powerful but has the drawback
that you can’t get the results easily into your quickfix window like you can
with vim-dispatch.
tpope/vim-speeddating: quickly change dates
The vim-speeddating plugin is designed for manipulating dates in your buffers.
Its key features include the ability to increment or decrement dates with easy
keystrokes, quickly jump to specific days, months, or years, and intelligently
recognize various date formats. With vim-speeddating, you can effortlessly
navigate and manipulate dates directly in your text editor.
Normal bindings use <C-A> combination which I use as a tmux escape sequence.
So I have reconfigured the plugin to use <C-u> and <C-d> instead.
-
<C-u>: increment the date part under the cursor by one. -
<C-d>: decrement the date part under the cursor by one.
Normal vim combinations work as expected and for instance to add 20 days to a
date you would just place the cursor on the day in the date and do 20<C-u> to
add 20 days.
Command Cheatsheet
No article about vim is fully complete unless it also includes a comprehensive cheat sheet for Vim.
Basic commands
-
:e <filename>- Open a file in neovim -
:e <tab>- Auto-complete file names -
:e!- Revert to the last saved version of the file -
:w- Save the current file -
:w !sudo tee %- Save the current file as sudo (this doesn’t always work) -
:q- Quit neovim -
:q!- Quit neovim without saving changes -
:wq- Save and quit neovim -
:waqa- Save all files and quit neovim -
:b <filename>- Switch to a different buffer -
:bd- Close the current buffer -
:bn- Go to the next buffer -
:bp- Go to the previous buffer -
:r <filename>- Insert the contents of a file into the current buffer -
:r! <command>- Insert the output of a shell command into the current buffer -
:sp- Create a new horizontal split -
:sp <filename>- Open a file in a horizontal split -
:tabnew <filename>- Open a file in a new tab -
:tabnext- Go to the next tab -
:tabprev- Go to the previous tab -
:vsp- Create a new vertical split -
:vsp <filename>- Open a file in a vertical split
Copying and pasting
-
y- copy visually selected text -
yy- copy current line -
yip- yank inner paragraph (not including delimiters) -
yap- yank outer paragraph (includes delimiters such as empty lines on each end) -
p- paste last copied or deleted text -
"0p- paste last copied text
Moving around
-
$- Go to the end of the line -
,- Repeat the last f, F, t, or T command in the opposite direction -
.- Repeat the last change -
/- Search for a pattern -
0- Go to the beginning of the line -
F<char>- Go to the previous occurrence of<char> -
G- Go to the end of the file -
H- Go to the top of the screen -
L- Go to the bottom of the screen -
M- Go to the middle of the screen -
N- Go to the previous search result -
;- Repeat the last f, F, t, or T command -
gd- Go to the definition of the variable or function under the cursor -
gf- Go to the file under the cursor -
gg- Go to the beginning of the file -
gg- Go to the beginning of the file
Editing text
-
<<- Unindent the current line -
<C-a>- Increment the number under the cursor -
<C-r>- Redo the last undo -
<C-r>%- Insert the name of the current file (in insert mode) -
<C-v>- Enter visual block selection mode -
<C-x>- Decrement the number under the cursor -
>>- Indent the current line -
A- Enter insert mode at the end of the line -
D- Delete to the end of the line -
I- Enter insert mode at the beginning of the line -
O- Insert a new line above the cursor and enter insert mode -
P- Paste before the cursor -
T<char>- Go to the character after the previous occurrence of<char> -
V- Enter visual line mode -
X- Delete the character before the cursor -
[p- Paste and unindent (paste the contents of the clipboard without indentation) -
]p- Paste and indent (paste the contents of the clipboard with indentation) -
a- Enter insert mode after the cursor -
c- Change (delete and enter insert mode) the selected text -
ca"- Change around double quotes -
ca'- Change around single quotes -
ca(- Change around parentheses -
ca<- Change around angle brackets -
ca[- Change around square brackets -
ca`- Change around backticks -
cab- Change around braces -
cap- Change around paragraph -
cas- Change around sentence -
cat- Change around tag -
caw- Change around word -
ca{- Change around curly braces -
ci"- Change inner double quotes -
ci'- Change inner single quotes -
ci(- Change inner parentheses -
ci<- Change inner angle brackets -
ci[- Change inner square brackets -
ci`- Change inner backticks -
cib- Change inner braces -
cip- Change inner paragraph -
cis- Change inner sentence -
cit- Change inner tag -
ciw- Change inner word -
ci{- Change inner curly braces -
d- Delete the selected text -
d$- Delete to the end of the line -
da"- Delete around double quotes -
da'- Delete around single quotes -
da(- Delete around parentheses -
da<- Delete around angle brackets -
da[- Delete around square brackets -
da`- Delete around backticks -
dab- Delete around braces -
dap- Delete around paragraph -
das- Delete around sentence -
dat- Delete around tag -
daw- Delete around word -
da{- Delete around curly braces -
dd- Delete the current line -
di"- Delete inner double quotes -
di'- Delete inner single quotes -
di(- Delete inner parentheses -
di<- Delete inner angle brackets -
di[- Delete inner square brackets -
di`- Delete inner backticks -
dib- Delete inner braces -
dip- Delete inner paragraph -
dis- Delete inner sentence -
dit- Delete inner tag -
diw- Delete inner word -
di{- Delete inner curly braces -
dw- Delete the current word -
gUU- Uppercase the current line -
gUw- Uppercase the current word -
guu- Lowercase the current line -
guw- Lowercase the current word -
gv- Reselect the last visual selection -
i- Enter insert mode at the cursor -
n- Go to the next search result -
o- Insert a new line below the cursor and enter insert mode -
p- Paste after the cursor -
r<char>- Replace the character under the cursor with<char> -
t<char>- Go to the character before the next occurrence of<char> -
u- Undo the last change -
v- Enter visual character mode -
x- Delete the character under the cursor -
y- Yank (copy) the selected text -
yw- Yank (copy) the current word -
yy- Yank (copy) the current line -
~- Toggle the case of the current character
Sorting
-
:sort- Sort the lines in the file or in current selection -
:sort n- Sort the lines in the file numerically -
:sort r- Sort the lines in the file in reverse order -
:sort u- Sort the lines in the file, removing duplicates
Shell commands from Vim
-
:! <command>- Execute a shell command -
:!cd <directory>- Change the current directory -
:!gcc % && ./a.out- Compile and run the current file with GCC -
:!gcc %- Compile the current file with GCC -
:!ls- List the files in the current directory -
:!make- Run the make command -
:!make clean- Clean the project directory -
:!pwd- Show the current directory
Command execution
-
:%norm <command>- Execute the command on every line in the file -
:%norm I//- Comment out all lines in the file
Searching and replacing
-
:%s/search//gn- Count the number of instances of “search” -
:%s/search/replace/g- Replace all instances of “search” with “replace” in the file -
:%s/search/replace/g<n>- Replace instances of “search” with “replace” in the file only on lines where n instances are present. -
:%s/search/replace/gc- Replace all instances of “search” with “replace” in the file, with confirmation -
:%s/search/replace/gc- Replace all instances of “search” with “replace”, with confirmation -
:s/old/new/g- Replace all instances of “old” with “new” in the current line -
:s/old/new/gc- Replace all instances of “old” with “new” in the current line, with confirmation -
:g/^\\s\*$/d- Delete all empty lines in the file -
:g/search/d- Delete all lines that contain “search” -
:v/search/d- Delete all lines that do not contain “search” -
:n- Go to the next search result -
:N- Go to the previous search result -
:noh- Turn off search highlighting -
?- Search backwards for a pattern -
f<char>- Go to the next occurrence of<char>
Settings and configuration
-
:set ai!- Toggle auto-indentation (note that ’!’ on variables means toggle) -
:set autoindent- Enable auto-indentation -
:set autoread- Automatically reload files when they change -
:set background=dark- Set the background color to dark -
:set background=light- Set the background color to light -
:set backspace=indent,eol,start- Allow backspacing over everything (default) -
:set cindent!- Toggle C-style indentation -
:set clipboard=unnamedplus- Use the system clipboard at all times for all copying and pasting -
:set colorcolumn=80- Highlight the 80th column -
:set cursorline- Highlight the current line -
:set nocursorline- Disable highlighting of the current line -
:set expandtab- Use spaces instead of tabs -
:set noexpandtab- Always use tabs -
:set foldenable- Enable code folding -
:set foldlevel=1- Set the initial fold level to 1 -
:set foldmethod=indent- Fold based on indentation -
:set hlsearch- Enable search highlighting -
:set ignorecase- Ignore case in searches -
:set ignorecase!- Toggle the ‘ignorecase’ option -
:set noignorecase- Case sensitive searches -
:set incsearch- Incremental search -
:set laststatus=2- Always show the status bar -
:set lazyredraw- Speed up scrolling in large files -
:set linebreak- Enable line wrapping -
:set list- Show whitespace characters and tab characters -
:set list!- Toggle the ‘list’ option -
:set listchars=tab:>-- Show tabs as >--- -
:set listchars+=eol:$- Show end-of-line characters -
:set listchars+=extends:›,precedes:‹- Show line continuation characters -
:set listchars+=tab:»\\ ,trail:•- Show tab characters and trailing whitespace -
:set listchars=tab:\\ \\ ,trail:-,extends:>,precedes:<- Show tab characters and trailing spaces -
:set mouse-=a- Disable mouse support -
:set mouse=a- Enable mouse support -
:set noerrorbells- Disable error bells -
:set nohlsearch- Disable search highlighting -
:set noincsearch- Disable incremental search -
:set nolist- Hide whitespace characters -
:set nonumber- Hide absolute line numbers -
:set norelativenumber- Hide relative line numbers -
:set noruler- Hide the current position in the file -
:set noshowcmd- Hide the keys being typed on the command line -
:set nospell- Disable spell checking -
:set noswapfile- Disable swap files -
:set novisualbell- Disable visual bells -
:set nowildmenu- Hide the command-line completion menu -
:set nowrap- Disable line wrapping -
:set nowrapscan- Stop searching at the end of the file -
:set number- Show line numbers -
:set numberwidth=5- Set the width of line numbers to 5 characters -
:set relativenumber- Show relative line numbers -
:set ruler- Show the current position in the file -
:set scrolloff=5- Set the number of lines to keep visible above and below the cursor to 5 -
:set shiftwidth=4- Set the indentation level to 4 spaces -
:set showcmd- Show the keys being typed on the command line -
:set smartcase- Use case-sensitive search if there are uppercase letters in the search query -
:set smartcase!- Toggle the ‘smartcase’ option -
:set softtabstop=4- Set the number of spaces inserted for each press of the Tab key to 4 -
:set spell- Enable spell checking -
:set spellcapcheck- Check spelling of capitalized words. -
:set spellfast- Enable fast spell checking. -
:set spellfile- Set the name of the spell file. -
:set spelllang- Set the language for spell checking. -
:set spelllang=en- Set the spell checking language to English -
:set spelllang=fr- Set the spell checking language to French -
:set spellsuggest- Set the number of spelling suggestions. -
:set spellword- Add the current word to the spell file. -
:set splitbelow- Open new windows below the current window -
:set splitbelow!- Toggle the ‘splitbelow’ option -
:set splitright- Open new windows to the right of the current window -
:set splitright!- Toggle the ‘splitright’ option -
:set syntax=c- Enable C syntax highlighting -
:set syntax=off- Disable syntax highlighting -
:set tabstop=4- Set tab width to 4 spaces -
:set termguicolors- Use terminal colors in the GUI version of vim -
:set textwidth=80- Set the maximum line width to 80 characters -
:set undolevels=1000- Set the maximum number of undo levels to 1000 -
:set virtualedit=all- Allow all virtual editing -
:set virtualedit=onemore- Allow the cursor to move one character beyond the end of the line -
:set wildmenu- Show the command-line completion menu -
:set winheight=20- Set the window height to 20 characters -
:set winwidth=80- Set the window width to 80 characters -
:set wrap- Enable line wrapping -
:set wrap!- Toggle line wrapping -
:set wrapmargin=2- Set the wrap margin to 2 characters
Window commands
-
:spellgood <word>- Add word to the good word list. -
<C-g>- Show the current file name and position -
<C-i>- Go forward to the next position when using goto-file -
<C-o>- Go back to the previous position when using goto-file -
<C-w> + h- Move to the left split -
<C-w> + j- Move to the bottom split -
<C-w> + k- Move to the top split -
<C-w> + l- Move to the right split -
<C-w>+- Increase the window size -
<C-w>-- Decrease the window size -
<C-w>\_- Maximize the current window vertically -
<C-w>|- Maximize the current window horizontally -
[q?- Go to the previous quickfix entry -
]q- Go to the next quickfix entry -
gF- Go to the file under the cursor in a new tab -
ga- Display the ASCII value of the character under the cursor -
gT- Go to the previous tab -
gt- Go to the next tab
Folding
-
z-- Scroll the current line to the bottom of the window and put the cursor at the last non-blank character -
z<Enter>- Scroll the current line to the top of the window and put the cursor at the first non-blank character -
zo- Open a fold. -
zc- Close a fold. -
zO- Recursively open a fold and all its nested folds. -
zC- Recursively close a fold and all its nested folds. -
zM- Close all folds. -
zR- Open all folds. -
za- Toggle the current fold. -
zA- Toggle the current fold and all its nested folds. -
zj- Move to the next fold. -
zk- Move to the previous fold. -
zb- Scroll the current line to the bottom of the window -
zt- Scroll the current line to the top of the window -
zz- Center the current line in the window
Complex stuff in vim
:%s/^\s\+\|\s\+$//g- Remove leading and trailing whitespace from all lines in the file.
Explanation: %s is the substitute command that searches for a pattern
and replaces it with another. ^\s+\|\s\+$ is the pattern that
matches one or more whitespace characters (\s) at the beginning (^) or
end (are separated by the|` character, which means “or”. The replacement text is
empty (//), and the g flag means “global”, so it replaces all instances
on each line with empty string.
:g/^#/d- Delete all lines in the file that begin with a#character.
Explanation: :g is the global command that applies an operation to all lines
that match a pattern. ^# is the pattern that matches the # character at the
beginning of a line. d is the delete operator, which deletes the matching
lines.
:s/\v(\<\w+\>)(\w+)/\1\u\2/g- Capitalize the first letter of the first word following a HTML tag.
Here is another way to write it: %s/\v\<[^/][^>]*\>\zs\w\@=/\u&/g
Explanation: \v enables “very magic” mode, which simplifies the pattern
syntax. (\<\w+\>) matches an HTML tag, and @⇐ is a zero-width look-behind
assertion that specifies that the next pattern should follow immediately after
the tag. (\w+) matches the word following the tag, and \u\2 replaces the
second match (the word) with capitalized first letter.
:%!sort -r- Sort all lines in the file in reverse order.
Explanation: % represents the entire file range. ! sends the command to the
shell. sort -r sorts the lines in reverse order.
:g/^\s*$/d | :%s/^\s+// | :%s/\s\+$//- Remove all empty lines, leading whitespace, and trailing whitespace from the file.
Explanation: :g/^\s\*$/d deletes all empty lines. :%s/^\s+// removes leading
whitespace from all lines. :%s/\s\+$// removes trailing
whitespace from all lines. | is a command separator.
:%s/\v(\w)(\w*)/\u\1\L\2/g- capitalize the first letter of every word in the file.
Explanation: - % is a range specifier that applies the substitution to the
entire buffer. - s initiates a substitution command. - /\v(\w)(\w*)/ is a
regular expression pattern that matches a word with two capture groups: the
first character and the rest of the word. - \v enables “very magic” mode,
which allows for a more concise syntax. - (\w) captures the first character of
the word. - (\w*) captures the rest of the word. - /\u\1\L\2/g is the
replacement pattern that uppercases the first character and lowercase the rest
of the word. - \u capitalizes the first character. - \1 refers to the first
capture group, which is the first character of the word. - \L lowercases the
rest of the word. - \2 refers to the second capture group, which is the rest
of the word. - /g specifies that the substitution should be made globally
throughout the file.
Recap
This was a long article and worst of all I feel like it’s not entirely complete. There is more that can be said about Vim but I think we have covered the most important aspects of it and I have shown you how you can configure Vim to be your ultimate IDE environment of choice.
Here is what you should have right now:
-
Beautiful UI with lots of information: We have installed Airline, Devicons, Nerdtree, Gitsigns, and ALE, which provide lots of additional information as you type your code in different languages and work with version control of your files. We also have Undotree to help with undo operations and Tagbar to help with code navigation.
-
Improved productivity: With plugins such as nvim-compe, ale, and nvim-lspconfig, you can enjoy features like autocomplete, syntax checking, and language server protocol support, which can help you do faster and more efficient coding. With ALE connected to clang language server you can see all static analysis errors in your C code in real time.
-
Enhanced syntax highlighting: Plugins like nvim-treesitter and vim-airline-themes provide visually appealing and customizable color schemes and syntax highlighting, making it easier to read and understand code. Same for the catppuccin color scheme as well.
-
Language aware code completion: We have installed LSP config and configured the built-in LSP server in Neovim to give us highly effective code completion for C.
-
Better organization: Plugins like bufferline.nvim and vim-buffergator provide a more intuitive and organized way to navigate between open buffers, allowing users to quickly switch between files and panes.
-
Documentation tools: Plugins like vim-asciidoctor and vimtex make it easier to write and manage documentation within Vim, helping you write better documentation without added overhead of doing so in tools that are not easily compatible with git. DoxygenToolkit makes it easy to add doxygen comments to functions in C.
-
Git integration: We have a fantastic Git integration using Gitsigns and Fugitive plugins, which give us the ability to inspect each line of code from a source control perspective (Git Blame), stage partial commits from selection, and commit our changes into Git. If you are like me, you will probably continue to use Tig and Git rebase from the command line, but having editor integration provides its benefits as well.
-
Debugger integration: We have also integrated a debugger into our Vim UI, allowing us to interact with the application being debugged over the Debug Adapter Protocol using any debugger that supports it (and also with Renode).
-
AI Integration: We have even integrated AI into our Vim UI, even though AI is not yet fully capable of error-free coding. It is a very quickly developing area of research, and having editor support for it early is extremely important. You can now use it in Vim for brainstorming and simple rewrite tasks.
The true power of Vim comes from the fact that many of the tools that we have installed are universal and will work with many different file formats that you are editing.
When you are editing in Vim, while the editing commands may be the same the actual implementations depend on which file you are editing. Plugins can map keys and tap into what you would expect vim to do and then implement that functionality across many file formats.
By studying exiting vim plugins and following the trail from a key binding to actual implementation you can further learn how to extend your editing environment to do exactly what you want. This is the true power of vim. Vim generalizes text editing and once you learn how it does it, you can enhance your text editing experience no matter what it is that you are editing.
Questions
Is there some easy way to learn Vim?
The most fun and most exciting way to learn Vim commands that I have ever come across was the link: Vim Adventures game that teaches you how to use Vim from beginner to advanced.
In the game, you move using Vim commands and as you progress through the levels, you will have to start using more and more advanced commands to move through the levels and accomplish your objectives.
How do I learn Vim script?
Learn Vim Script The Hard Way is a quick tutorial teaching you the basics of scripting language that you can use to write plugins.
There are many benefits to write plugins in Vim script rather than python or Lua. Vim script is extremely fast and specifically designed for extending the text editor and working with text. It may look intimidating at first but it is actually pretty neat.
How do I execute visual selection as vim script?
When working with vim configuration it is often useful to run blocks of vim script without reloading the whole Vim configuration file. You can do it by combining copy and execute commands:
-
Select a block you want to run
-
"y- copy text into register -
@- execute contents of the register
How do I see where vim has set a variable?
If you find that your variables are getting reset by some plugin to some value
that is not the value you want, then the :verbose set <name> will show you
where the variable was set. If the variable is set in Lua then you will need to
run neovim with at least verbosity level of 1 (-V1) to see the location (such
instrumentation is slow so you need to explicitly enable it).
:verbose set tabstop
tabstop=4
        Last set from ~/.config/nvim/init.vim line 24
Where can I find a good default Vim configuration?
I have uploaded the latest version of Vim configuration that I’ve covered in this tutorial to the Swedish Embedded Workstation git repository here
You can run ./scripts/bootstrap/nvim script in that repository to compile
latest Nvim and configure it automatically to the settings discussed in this
tutorial. There can be some discrepancy between the script and this tutorial
since they are not always in sync but you will have to solve such minor issues
on your own.
How do I split my Vim editor into multiple windows?
Personally I use tmux for managing terminals. This is far superior to using
the built in terminal in Vim and in fact I almost never use it. The repository I
mentioned above also has a very nice tmux config which enables mouse support
so you can resize panes using your mouse.
The end result is that you can have your Vim window in a tiled arrangement with
any number of terminals and you can also have multiple tabs with multiple
terminal windows in them. The tmux tabs are useful for separating workspaces
and Vim window splits are useful for editing multiple files side by side.

Get a focused reply on your firmware challenge
Share your target hardware, OS, and current blocker — you'll get a tailored response within 1–2 business days with concrete next steps.
Fastest path: LinkedIn
Message on LinkedIn with your details, or use the form below.
Want an overview of services? Visit the firmware page.